Posted: Thu Aug 03, 2017 5:05 am Post subject: xbox v1.0 with aladdin xt plus2 modchip
hello,
I bought a used xbox, it had an aladdin xt plus modchip in it, and another square shaped green modchip under the mb with many wires, it wasn't working, it had the common disease (on 1 sec, off, on 1 sec, off, on with light blinking green and red.
anywayz i removed both the chips, that didn't help, then I installed socket of a new aladdin xt plus 2, it worked, but oooonly booting the starting splash , no EVOX logo !! also the LED in the modchip is always on, which means that something is wrong, it shouldn't be on always like that if iam not mistaken
i tried both wiring plans non of them gave me evox logo on screen
i tried the normal wiring in the diagram connected to mb: L0, D0, BT
then i tried connecting bt on the modchip to the lower left connector on the chip too to enable always on, also no use...
what is wrong here?! no evox logo at all, tried the modchip on other console and it works..
any clues? thnx
KIxxx Xbox-HQ Member
Joined: May 28, 2017 Posts: 99 Location: Canada
Posted: Sat Aug 05, 2017 1:48 am Post subject:
Check the board for traces. Based on what you posted the circuit is still connected. Bad soldering dropping biubbles that connect points is my opinion. If you can take some good HD pics and post them I can give you a more definitive answer.
Plus side you can still softmod the sucker using Babylon and at least salvage it. Of course fixing the chip is #1 but just saying
somacast Xbox-HQ Newbie Xbox Version: 1.6b Modded: Babylon 3
Joined: Aug 02, 2017 Posts: 4
Posted: Sun Aug 06, 2017 4:43 am Post subject:
KIxxx wrote:
Check the board for traces. Based on what you posted the circuit is still connected. Bad soldering dropping biubbles that connect points is my opinion. If you can take some good HD pics and post them I can give you a more definitive answer.
Plus side you can still softmod the sucker using Babylon and at least salvage it. Of course fixing the chip is #1 but just saying
thanks a lot for the hints, I did my best trying to find anything, but no luck at all, I will try to post some pics later
kaos_engr V.I.P. Lifetime
Joined: Jun 04, 2012 Posts: 194
Posted: Sat Aug 19, 2017 9:25 am Post subject:
BT and D0 should be the only pads that need to be connected from the modchip to the Xbox motherboard to work.
What version Xbox? 1.6 it'll be a bit different than what I mentioned above.
See attachment of Aladdin XT plus 2 installation diagram here.
somacast Xbox-HQ Newbie Xbox Version: 1.0/1.1/1.4/1.6 Modded: X2/X3/XST/Xenium
Joined: Aug 02, 2017 Posts: 4
Posted: Sun Aug 20, 2017 4:37 am Post subject:
thanks for your reply,
its a 1.0 , and yet it did not work with these 2 wires
kaos_engr V.I.P. Lifetime
Joined: Jun 04, 2012 Posts: 194
Posted: Tue Aug 22, 2017 4:46 am Post subject:
somacast wrote:
thanks for your reply,
its a 1.0 , and yet it did not work with these 2 wires
You have to hold the power button down for a couple of seconds to activate the chip. A short press/tap will power up the Xbox in stock/non-modded configuration.
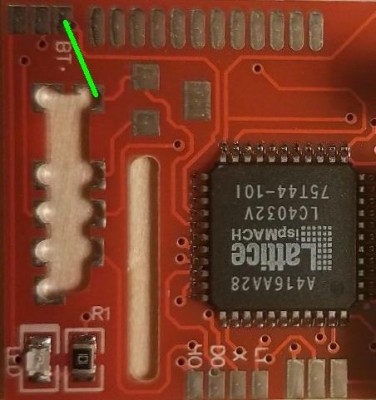
Instead of connecting BT to front panel power button point on Xbox MB, connect BT to GND - pin 2 of the quick-solder section of the modchip. The modchip will be configured for always ON operation.
Only other required connection will be modchip D0 pad to D0 point on Xbox motherboard (MB). Location depends on your Xbox MB version.
Aladdin XT plus 2 - Always ON - Jumper (Green).jpg
Description:
Always ON - Solder jumper wire between BT and QSB pin 2 (GND)
Filesize:
32.68 KB
Viewed:
431 Time(s)
|
All times are GMT |Page 1 of 1
You cannot post new topics in this forum You cannot reply to topics in this forum You cannot edit your posts in this forum You cannot delete your posts in this forum You cannot vote in polls in this forum You cannot attach files in this forum You can download files in this forum