|
|
 |
TSOP Flashing HOW TO |
 |
TSOP Flashing HOW TOPublished by  user1 on 2009-08-11 user1 on 2009-08-11
Category: Hardware Mods/Addons | Page Views: 56,664
TSOP flashing HOWTO
From Xbox-Linux
On Version 1.0-1.5 Xboxes the BIOS is stored on a flashable chip known as a TSOP. On a standard Xbox write access to this chip is disabled but it is possible to enable write access by soldering some points on the Xbox motherboard. You can then replace the BIOS with Cromwell a free, legal bios replacement for the Xbox capable of loading Linux.
On Version 1.6 Xboxes the BIOS is no longer stored on a flashable chip. This means replacement of the BIOS is not possible without the use of a modchip.
Table of contents
1 General Notes
1.1 Points for 1.0->1.1 Xboxes
1.2 Points for 1.2->1.5 Xboxes
1.3 Transferring the Savegames
1.4 Flashing the TSOP
General Notes
There are two points to solder in order to enable write access to the Xbox flash chip. Where these points are to be found depends on the version of Xbox motherboard you have.
Open the Xbox and remove the HDD and DVD drive. If you have a 1.0 or 1.1 Xbox, you must remove the motherboard. If you have a 1.2->1.5 Xbox, you can perform the soldering without removing the motherboard, as both points are on the top of the board. If you want to give yourself more space, you can remove the motherboard anyway.
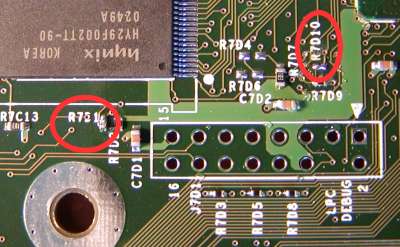
Locate the following area near the IDE connector:
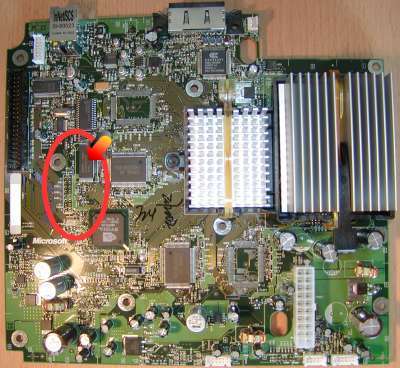
The BIOS chip (a TSOP) is circled.
The two pairs of solder pads need to be bridged together - there are three techniques you can use to do so:
1. Blob solder across them - this proved to be surprisingly difficult! Although close together, the pads are just far enough apart to make it difficult to get the solder to join them up. Some people seem to have no difficulty with this, so by all means try it. A relatively simple technique is to use a low or variable temperature soldering iron (or a cordless soldering iron), and heat the solder only until it just melts. While hot solder is very runny, ans will flow into a pair of spheres on each side of the bridge, cool solder has a very waxy consitency and can be easily dragged into a single blob to close the bridge.
1. Join them with a VERY fine strand of wire. This is the method I used after failing at (1). I removed a single strand of wire from a piece of multistrand copper wire I had lying around. I bent the end of this into a right angle, the right angled piece slightly longer than the two pads I wanted to join. Then, lightly tin the right angled piece, and lie it carefully across the pads. Using one fingernail, hold it in place at one end, and CAREFULLY dab solder on the other end to hold it in place. When you're happy that that end is fixed, use your fingernail to hold that end in place, and gently dab solder on the other end (Even though one end is soldered, you need to hold that end in place to solder the other one or the heat will melt the solder and it will come loose again). Once this is done, GENTLY bend the excess wire back and forth until it snaps off (If you are too rough with this, you risk pulling the small solder pads from the board!
If you dont want to solder, you can use a Conductive Trace Pen such as one found here (http://www.electronix.com) or here (http://www.radioshack.com). Alternatively you can use car rear-window heating element repair paint (basically the same kind of stuff). In the UK, you can buy this from Halfords, although it's quite expensive (£7 per small bottle). It's electroconductive paste (silver particles in suspension) and can be used to paint across the two links, thus joining them. Don't use more than necessary or you will join more links than you intend! It's wise to apply it with a small toothpick dipped in the paint.
If you have a multimeter with fine enough probes, you can use it to check that the pads are connected properly.
Once you have identified your Xbox motherboard version, solder the specific points mentioned in the appropriate section below.
Points for 1.0->1.1 Xboxes
For the 1.0 and 1.1 XBox motherboard revision, it is necessary to join two sets of solder pads together in order to enable write access. One is on the top of the motherboard, one in a similar area underneath the board, so it is necessary to remove the board from the case.
These are circled in the images below. ( The top point is the same as 1.2->1.5 versions)
Point on top of motherboard:
Top solder point
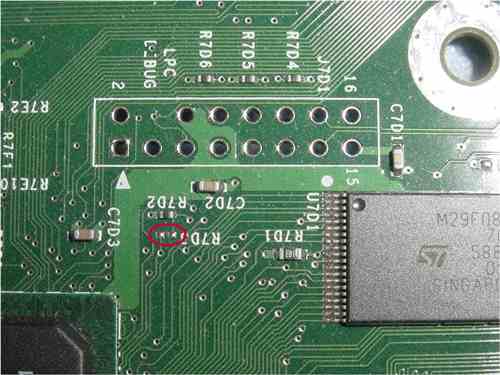
Point on bottom of motherboard:

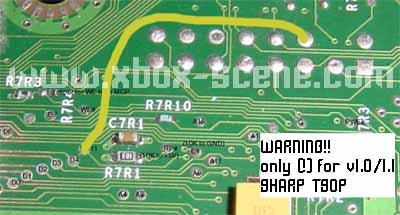
IMPORTANT! If you have a Sharp brand of TSOP (not the one above, ST isn't Sharp Technologies), you need to make another connection. You need to connect 5 volts to the TSOP as shown in the picture below. Do not do this on any other brand of TSOP, or you will fry the chip. Sharp TSOPs need the extra voltage boost to clear out the existing contents of its memory banks. If that voltage is not supplied, it can not properly reflash with Cromwell and the chip might be damaged!!!.
Note: These boards contain a 1024k TSOP chip, DO NOT flash the small 256k cromwell image to the chip. ALWAYS use the 1024k image.
Points for 1.2->1.5 Xboxes
As both the 'flash write enable' points are located on top of the motherboard, it is not necessary to remove the motherboard from the Xbox case, but it will provide more working room if it is removed.
For the 1.2->1.5 XBox motherboard revisions, it is necessary to join two sets of solder pads together in order to enable write access. You will find that some other guides mention a third point, on the bottom of the motherboard - this is not necessary- it is electrically identical to one of the top points shown here.
These are circled in the images below. The two silver dots in the circle are the points to be soldered. You can see them more clearly by looking at the difference between the two pictures.
Before soldering:
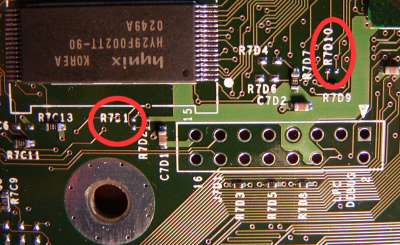
After soldering:
Transferring the Savegames
Note: There is a simplified method for achieving this here.
1. Download the MechInstaller images. Now, with your favorite editor, put this code into findfatx.sh:
for i in /dev/sd? /dev/disk?; do
test FATX = $(dd if=$i bs=4 count=1 2> /dev/null) 2> /dev/null && echo $i
done
1. Plug your memory stick into your Xbox and let it format. When that is done, put it in your computer.
2. Run sh findfatx.sh and make sure that it is the memory stick you are using.
3. Connect your USB memory stick and type:
cat image.img > $(sh findfatx.sh)
4. Connect your memory stick to your Xbox again and copy the savegames on the memory stick to the hard drive.
Flashing the TSOP
1. Boot into MechAssault and run Emergency Linux saved game.
2. Set up your PC so that it has an IP of 192.168.0.* and has a subnet of 255.255.255.0. The ip address of the Xbox should be displayed on the TV.
3. FTP into the Xbox and transfer Cromwell. Make sure you use the Cromwell image that is appropriate for your TSOP! If you get a permission denied error, change into one of the temporary directories (e.g. /mnt/X)
4. Telnet into the Xbox as root (root + xbox in default Xebian setup).
5. Type raincoat. If it recognizes your TSOP type, you are ready to flash! Otherwise, you didn't connect the solder points properly. Power down and try again from the top.
6. Backup your current image by typing:
raincoat -r old_image.bin
It will save a backup image file to your current directory. View the file properties to verify the image size. It should be identical in size to the one you're planning to use.
7. Type:
(for v1.2 and higher) or
raincoat -p image_1024.bin (for v1.0 and v1.1).
8. Take a deep breath. You should see a progress bar show the burn, followed by a success notification.
9. If ANYTHING other than a successful burn happens, immediately reverse the process by typing raincoat -p old_image.bin to put the old image back on. Figure out what you did incorrectly (improper soldering or wrong image size, usually.) Fix this and try again from the top.
10. Once you're SURE you got a good burn, restart your Xbox.
If your Xbox turns on and goes to Cromwell, congratulations! Otherwise, your TSOP is SOL! If this happens, it is possible to socket your TSOP and hotswap, or (almost certianly) buy a modchip. It is possible to temporarily solder in one of the more complicated (29-wire) modchips and overwrite a bad flash. However, it is far more advisable to buy one of the simpler, permanent chips!
Related URL: TSOP flashing HOWTO |
|
|
Browse Tutorials |
|
| |

 | Latest News | |
| Popular Xbox Games | |
 Shattered Union Shattered Union
 Page Views: 282,822 Page Views: 282,822
Set atop the smoldering ruins of a fictional United States torn apart by civil war, Shattered Union is an action-packed turn-based strategy game in which gamers will play through an exciting single pl.. |  | | More Xbox Games |
| |